カーソルをのせたときに画像を拡大したいんだけど、どうしたらいいんだろう
画像を拡大するには、①imgタグと②background-imageの2種類があるよ。
目次
カーソルを乗せた時(hover)画像を拡大【img】
イメージとしては
1_カーソルをのせた(hover)時にtransform: scale(1.1);で大きくする
2_枠を指定し、はみ出しているところをoverflow:hidden;で隠す
これをHTML/CSSで指定します。
<div class="box">
  <img src="画像">
</div>
.box {
width: 60%;
overflow: hidden;
position: relative;
cursor:pointer;
}
.box img{
width:100%;
transition: transform 0.6s ease;/*画像をゆっくり大きさを変える*/
}
.box:hover img{
transform: scale(1.1); /*hover時拡大*/
}See the Pen hover時拡大(img) by misaki (@miikolife) on CodePen.
ここでは、trasitionを指定してアニメーションを設定しています。
スピードを変更したい場合は、transition: transform 0.6s ease;の部分を変更してください。
overflow:hidden;を指定しないと画像そのものが大きく表示されてしまうので、注意してください。
拡大時に黒い透過背景と文字入れ
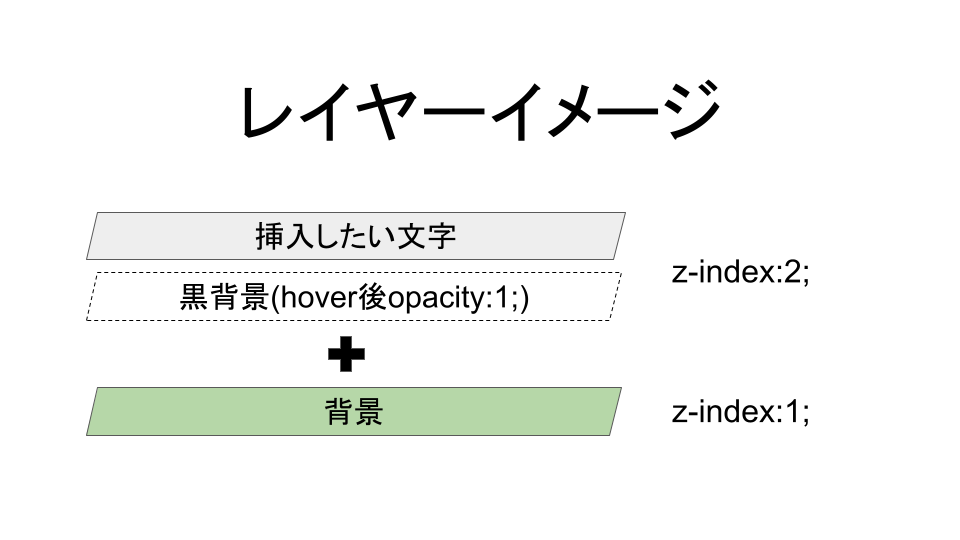
hover時に黒い透過背景を入れたい場合はz-indexの値に注意してください。
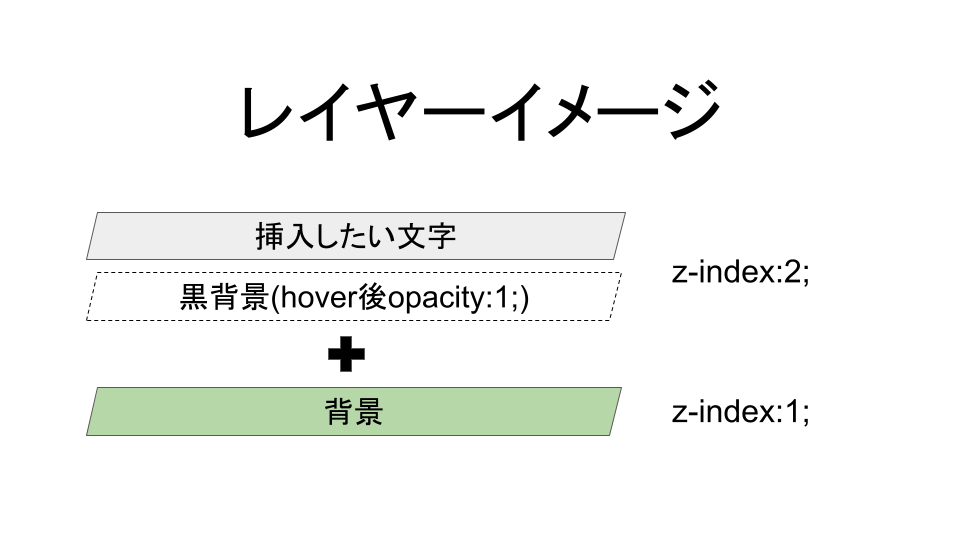
.boxの疑似要素に黒背景を指定し、.boxのhoverにopacity:1.0で表示させます。
<div class="box">
  <img src="画像">
  <p class="box__text">入れたい文字</p>
</div>
.box {
width: 60%;
overflow: hidden;
position: relative;
cursor:pointer;
}
.box img{
width:100%;
height:auto;
transition: transform 0.6s ease;/*画像をゆっくり大きさを変える*/
}
.box:hover img{
transform: scale(1.1); /*hover時拡大*/
}
/*黒背景の指定*/
.box::before{
background: rgba(0, 0, 0, 0.4); /* マスクの色*/
content: "";
position: absolute;
right: 0;
top: 0;
transition: opacity 0.6s ease; /* ゆっくりopacityのみ変化させる */
width: 100%;
height: 100%;
outline: 2px solid rgb(255, 255, 255);/* 白い囲い線 */
outline-offset: -8px;/* 囲い位置 */
z-index: 2;/* 位置 */
opacity: 0; /* 最初は透明(非表示) */
}
.box:hover::before{
opacity: 1;
}
.box__text{
margin:auto;
color:#fff;
width:80%;
position:absolute;
content:"";
top: 50%;
left: 50%;
transform: translate(-50%, -50%);
z-index:2;
}See the Pen hover時拡大(img黒背景込) by misaki (@miikolife) on CodePen.
カーソルを乗せた時(hover)画像を拡大【background-image】
1_background-imageを設定するdivタグを設定
2_transform:scaleで大きくする
3_background-size:cover;ではみ出ないように指定する
<div class="box">
    <div class="box-bg"></div>
</div>
.box {
width: 60%;
overflow: hidden;
position: relative;
cursor:pointer;
}
/*背景画像の設定*/
.box-bg{
padding-top: 63.2%;
background-image: url(画像);
background-position: center;
background-repeat: no-repeat;
background-size: cover;
height: 100%;
transition: transform 0.6s ease;/*画像をゆっくり大きさを変える*/
}
.box:hover .box-bg {
transform: scale(1.1); /*hover時拡大*/
}
See the Pen hover時拡大(background) by misaki (@miikolife) on CodePen.
拡大時に黒い透過背景と文字入れ
imgタグの時と同様の方法で、指定していきます。
<div class="box">
    <div class="box-bg"></div>
    <p class="box__text">入れたい文字</p>
</div>
.box {
width: 60%;
overflow: hidden;
position: relative;
cursor:pointer;
}
/*-- 黒背景 --*/
.box::before {
background: rgba(0, 0, 0, 0.4); /* マスクの色*/
content: "";
opacity: 0; /* 最初は透明(非表示) */
position: absolute;
right: 0;
top: 0;
transition: opacity 0.6s ease; /* ゆっくりopacityのみ変化させる */
width: 100%;
height: 100%;
outline: 2px solid rgb(255, 255, 255);/* 白い囲い線 */
outline-offset: -8px;/* 囲い位置 */
z-index: 2;/* 位置 */
}
.box:hover::before {
opacity: 1;/*hover時に黒背景出現*/
}
/*背景画像の設定*/
.box-bg{
padding-top: 63.2%;
background-image: url(画像);
background-position: center;
background-repeat: no-repeat;
background-size: cover;
height: 100%;
transition: transform 0.6s ease;/*画像をゆっくり大きさを変える*/
}
.box:hover .box-bg {
transform: scale(1.1); /*hover時拡大*/
}
.box__text {
font-size:20px;
color: #fff;
width: 80%;
margin: auto;
left:0;
position:absolute;
top:50%;
transform:translateY(-50%);
right:0;
z-index: 2;/* 位置指定 */
}See the Pen hover時拡大(background&黒背景&文字) by misaki (@miikolife) on CodePen.
まとめ
今回は、hoverした時に画像を大きくする方法をご紹介しました。
ご参考になれば嬉しいです。

